Wednesday, March 26, 2014

Recover Internet Explorer 11 Stored Password from Windows Vault

How to recover the stored passwords from Internet Explorer 11? In versions 7, 8 and 9 of Internet Explorer, passwords are protected using DPAPI and the login URL as entropy before being saved in the registry. Since Internet Explorer 10, it no longer stores encrypted passwords in the registry, and they're stored in the Windows Vault, which is the default storage vault for the credential manager information.

Internet Explorer 10 / 11 Stored Passwords

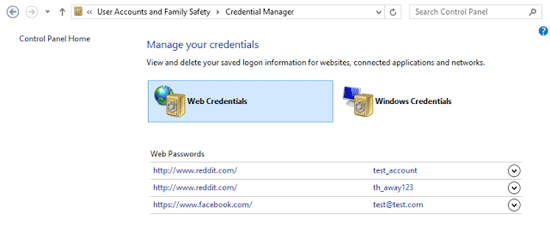
In this article we'll show you how to recover Internet Explorer 11 stored passwords from Windows Vault. With the Internet Explorer Password Recovery program you can retrieve all autocomplete passwords that are stored in the Credential Manager. This can be useful if a user forgot the password before reinstalling Windows.

How to Recover Internet Explorer 11 Stored Passwords?
  1. Download and install the Internet Explorer Password Recovery program on your computer.
  2. After you've installed it, start the program.
  3. Click on the Start Recovery button, and then select the Recover IE Password option from the drop-down menu.
  4. The program will decrypt your website passwords saved in Windows Vault, and display the login information (including website URL, username and password) immediately.
Besides recovering Internet Explorer 10/11 passwords, Internet Explorer Password Recovery program can also extract the saved passwords from Internet Explorer 6, 7, 8, 9.

Thursday, March 6, 2014

Lost Admin Rights on Windows 8/7/Vista/XP User Account

Lost admin rights / privileges on the only user account on your computer? If you can't access the administrator account, or your administrator account was demoted to a guest or limited account, you will be restricted from performing any administrative tasks.

In this tutorial we'll explain how to regain your PC's administrator rights with PCUnlocker. PCUnlocker is a bootable utility that could be used to promote a limited / standard user account to administrator, or unlock / reset your forgotten administrator password on Windows 8, 7, Vista and XP.


Part 1: Create A PCUnlocker Live CD/USB Drive

  1. Click here to download and save the PCUnlocker self-extracting Zip file to a folder on your hard drive, then extract the ISO image file: pcunlocker.iso from it.
  2. Insert a blank CD or USB flash drive into your computer. Download and install the freeware ISO2Disc.
  3. Start the ISO2Disc program. Click the Browse button to locate your ISO image file, then click the Start Burn button to burn the ISO image to your CD or USB flash drive.
    Burn ISO Image to CD/DVD or USB flash drive

Part 2: Boot Your Locked PC from CD/USB Drive

  1. Connect the burned CD or USB drive to the computer that you're trying to gain admin rights on. When it is powered on, check the boot-screen for setup key (i.e. DELETE key, F8 key, F2 key) to enter BIOS Setup Utility.
  2. Use the arrow keys to select the BOOT tab, then change the Boot Device Priority: Set 1st Boot Device to CDROM if you just created a bootable CD or DVD, or set 1st Boot Device to Removable Device if a bootable USB flash drive was created.
    BIOS Setting
  3. Press F10 to save your changes. Now your computer will restart and then boot from PCUnlocker Live CD/USB drive. If you still can't get your computer to boot from the CD/USB drive, please refer to this boot up troubleshooting guide.

Part 3: Gain Admin Rights on Windows Account

  1. After the computer boots up from the CD or USB drive, it will start the PCUnlocker program which shows you a list of local accounts that are stored in Windows SAM registry hive. Select your user account and click on Reset Password button.
    Gain Admin Rights on Windows Account
  2. Click Yes to confirm your operation. The program will remove your user password, promote your account to an administrator if it's a standard or limited account, and enable / unlock it when necessary.
  3. Click Restart to reboot the computer and remove the CD or USB drive. You can then log into your administrator-level user account without a password.
It's so easy to get admin rights back on your Windows account and regain full control of your computer. PCUnlocker has definitely saved me from so many headaches and I hope this will also help you in case you lost admin rights on Windows 8, 7, Vista or XP.

Tuesday, February 25, 2014

Lost Windows XP Password and Can't Login?

Lost Windows XP password and can't logon? This could put you in big trouble especially if you do not have any other OS configured for dual boot and this will prevent you from accessing your files as well. But there are many password recovery tools which can be used even if you do not have access to Windows.

PCUnlocker is one of the best and top rated password recovery tools, which could be used to remove lost Windows 8/7/Vista/XP passwords. This tutorial will guide you through the steps to unlock Windows XP administrator and user passwords with PCUnlocker Live CD/USB drive.

Part 1: Create a Bootable CD or USB Drive

  1. Download the self-extracting .zip archive of PCUnlocker using a working computer with internet connection. Unzip it and you'll get the pcunlocker.iso file, which contains a WinPE operating system along with the PCUnlocker software for you to reset Windows XP password.
  2. Burn the ISO image to a CD using your favorite CD/DVD burning software such as ImgBurn, BurnCDCC, etc. If you need to make a bootable USB drive, ISO2Disc could be of help.
    Burn ISO Image to CD or USB flash drive

Part 2: Change Boot Order

  1. Turn on your locked computer. When it is powered on, check the boot-screen for setup key (i.e. DELETE key, F8 key, F2 key) to enter BIOS Setup Utility.
  2. Use the arrow keys to select the BOOT tab, then change the Boot Device Priority: Set 1st Boot Device to CDROM so you can boot from the CD, or choose Removable Device if you want to boot off a USB flash drive.
  3. Press F10 to save your changes.

Part 3: Remove Windows XP Password

  1. After booting your locked Windows XP computer from the CD or USB drive, you'll see the main interface of the PCUnlocker application immediately.
  2. The application automatically locates Windows accounts inside the SAM registry file of your Windows XP installation. Each account is listed with its account properties to help users recognize if it is locked out, disabled, expired or password protected.
    Reset Windows XP Password
  3. Select a user account from the list, and click the Reset Password button. It will reset / unlock your lost Windows XP password instantly.
  4. After that's done, click the Restart button to reboot the computer and remove the CD or USB drive. When you get to the Windows login screen, just left the password blank and you can log on Windows XP successfully.
It's also a good idea to make a PCUnlocker Live CD or USB drive before you forget Windows login password. So you can use it to reset your lost Windows password anytime even if you are unable to find a working computer for downloading PCUnlocker.

Wednesday, January 22, 2014

Unlock Windows 8 Password for Local Account or Windows Live ID

Forgot the password of your Windows 8 Local or Microsoft account (formerly Windows Live ID)? Can't login to Windows 8 with Live account password? There's a way to unlock Windows 8 password and it doesn't involve reformatting and reinstalling Windows. The solution is called PCUnlocker, which allows you to reset lost Windows 8 password for both local account and Windows Live ID. Using the following guide, you can unlock Windows 8 password on any laptop/desktop/netbook/tablet PC in 3 simple steps. Here's how:

Step 1: Create a Bootable CD or USB Drive
  1. Download the self-extracting .zip archive of PCUnlocker using any computer you still have full access to. Unzip it and you’ll get the pcunlocker.iso file, which contains a WinPE operating system along with the PCUnlocker software for you to unlock Windows 8 password.
  2. Use the freeware ISO2Disc to burn the ISO image file to a blank CD or USB flash drive. Burn ISO Image to CD or USB flash drive
Step 2: Change BIOS Settings
  1. Once you've completed the above steps, put in the CD into the optical drive or plug in the USB drive into the computer you want to unlock the password for.
  2. Turn on the computer. When it is powered on, check the boot-screen for setup key (i.e. DELETE key, F8 key, F2 key) to enter BIOS Setup Utility.
  3. Use the arrow keys to select the BOOT tab, then change the Boot Device Priority: Set 1st Boot Device to CDROM so you can boot from the CD, or choose Removable Device if you want to boot off a USB flash drive.
  4. Press F10 to save your changes.
Step 3: Unlock Windows 8 Password
  1. Boot your locked computer from the CD or USB drive, and you'll see the main interface of the PCUnlocker application immediately.
  2. The application automatically locates all user accounts inside the SAM registry file of your Windows 8 installation. If you use a Microsoft account to sign into your Windows 8 system, there should be a local account associated with your Microsoft account (Windows Live ID). Reset Windows Password
  3. Select a local account from the list, and click the Reset Password button. It will reset your forgotten Windows 8 password instantly. To unlock a Microsoft account password, you need to choose the local account associated with your Windows Live ID.
  4. Click the Restart button to reboot the computer and remove the CD or USB drive. You can then log back into Windows 8 system with a blank password.
That's it – you have successfully unlock your Windows 8 password!

Monday, January 20, 2014

How to Reset Forgotten Windows 8.1 Password

If you ever find yourself locked out of your Windows 8.1 administrator account because you forgot the password, you'll know how frustrating it can be when you don’t have a reset disk. There are many Window password recovery Live CDs out there, but most of them are unable to deal with Microsoft account logon credential, or simply don't work because Windows 8.1 uses UEFI firmware instead of the traditional BIOS.

PCUnlocker is the most powerful Windows password recovery program which not only supports UEFI booting, but also allows you to reset Windows 8.1 password for both local account and Microsoft account. Let's walk you through the steps of resetting Windows 8.1 password without a reset disk.

Part 1: Create a Bootable CD or USB Drive
  1. Download the self-extracting .zip archive of PCUnlocker using any computer you have still have full access to. Unzip it and you'll get the pcunlocker.iso file, which contains a WinPE operating system along with the PCUnlocker software for you to reset Windows 8.1 password.
  2. Use the freeware ISO2Disc to burn the ISO image file to a blank CD or USB flash drive. Burn ISO Image to CD or USB flash drive
Part 2: Change BIOS Settings
  1. Turn on your locked computer. When it is powered on, check the boot-screen for setup key (i.e. DELETE key, F8 key, F2 key) to enter BIOS Setup Utility.
  2. Use the arrow keys to select the BOOT tab, then change the Boot Device Priority: Set 1st Boot Device to CDROM so you can boot from the CD, or choose Removable Device if you want to boot off a USB flash drive.
  3. Press F10 to save your changes.
Part 3: Reset Windows 8.1 Password
  1. Boot your locked Windows 8.1 computer from the CD or USB drive, and you’ll see the main interface of the PCUnlocker application immediately.
  2. The application automatically locates all user accounts inside the SAM registry file of your Windows 8.1 installation. If you use a Microsoft account with your Windows 8.1 system, there should be a local account which is linked to your Microsoft account. Reset Windows Password
  3. Select a local account from the list, and click the Reset Password button. It will reset your forgotten Windows 8.1 password instantly. To reset a Microsoft account password, you need to choose the local account which is linked to your Microsoft account.
  4. Click the Restart button to reboot the computer and remove the CD or USB drive. You can then log back into Windows 8.1 system with a blank password.
That's it – you have successfully reset your Windows 8.1 password!

Windows 8 UEFI Password Reset

Forgot the admin password on Windows 8 UEFI/GPT computer? Most of password recovery bootdisks won't boot normally any more when dealing with UEFI BIOS. PCUnlocker should be the unique bootdisk which is fully compatible with UEFI/GPT computer. It enables you to reset lost Windows 8 password with a UEFI bootable CD or USB drive.

There are three editions of PCUnlocker: Standard, Pro and Enterprise. But only the Enterprise edition supports UEFI booting. In this tutorial we're going to show you how to reset lost Windows 8 UEFI password using PCUnlocker Enterprise.

Step 1: Create A UEFI Bootable CD or USB Drive

After purchasing the full version of PCUnlocker Enterprise, you'll get the download link of PCUnlocker_UEFI_x64.zip. Unzip it and you’ll get the UEFI bootable ISO image of PCUnlocker. Burn the ISO image to a blank CD or USB flash drive using ISO2Disc.
Create A UEFI Bootable CD or USB Drive

Step 2: Boot Your Locked PC from CD/USB Drive

Connect the CD or USB drive to your locked Windows 8 UEFI computer. Turn on the computer and press a key like F12 to bring up the Boot Menu. The exact key depends on your computer. If you can’t find a way to access the Boot Menu, you can either head over to BIOS for changing the boot order: set CD or USB drive as the first boot option.
UEFI Boot Menu

Step 3: Windows 8 UEFI Password Reset

Now the computer will boot from the CD/USB drive. After a while, you'll see the PCUnlocker program itself, which automatically searches your Windows 8 SAM registry file and locates all Windows 8 user accounts existing on your computer.
Windows 8 UEFI Password Reset

Choose a user account and then click on "Reset Password" button. The program will remove / reset your lost Windows 8 password, as well as unlocking the selected user account in case it is disabled, locked out or expired.
Remove the Live CD/USB drive and restart your computer. Now you can log back into your Windows 8 UEFI computer without a password!

Tuesday, September 24, 2013

How to Lock and Password Protect Your Folder in Windows

I have a little sister who enjoys deleting folders and files that are important to me. I need an easy way to password protect my folders! How do I protect my folders and files from being deleted, or hide them from my sister?
We all have files on our system that are valuable to us and that we do not want to lose. This can be anything imaginable, from Office documents to images or video files. Luckily there is a simple program called Protect My Folders, which allows you to lock and password protect your folders. It prevents your data from being accessed, misused, moved, copied, altered or deleted. All of your protected folders and files remain inaccessible without your password.

How to Lock and Password Protect Your Folder in Windows?
  1. Download the Protect My Folders application. Install it on your computer.
  2. For the first time usage, it will ask you to set a password to prevent others from accessing this application. Just enter the password to open main interface.
    Lock and Password Protect any Windows Folder
  3. Now, click the "Add/Lock" button, the Add Files and Folders dialog will appear. Select a folder and file you want to lock and press OK.
  4. Now you'll notice the selected folder or file has disappeared from its former location. Even if you try to copy, delete, move or rename the parent directory of your protected folder or file, you'll keep getting the "Access Denied" error.
  5. Exit the Protect My Folders application. The protected folder or file remains protected.
Beside locking your folders or files with password, Protect My Folder program can also help you hide your folders so that no one will ever know that they exist. It's that simple!